B Brief research about a Seedbox and deploying one.

A seedbox is a remote server hosted in a high-bandwidth data center used for the safely uploading and downloading of digital files. These speeds range from 100Mbps (8MB/s) to 10Gbps (1250MB/s). Persons with access to a seedbox can download these files to their personal computers anonymously. (Source: Wikipedia)
Basically, in clear and understandable words, Seedbox is a server used for Peer-to-Peer (P2P) transfers with the use of BitTorrent protocol. Seedbox, what it is and how powerful it is, is determined by the hardware it runs on, how secure (anonymous) it is and how deaf that hosting company is.
Seedbox is just a server with a certain purpose and protocol, seed the files you have stored in your server which is also known as pirating in the eyes of law makers and well, pirates!
Not to call myself a pirate, I try my very best to refrain from brushing against the law and the law makers, as a tech fanatic and a student pursuing Engineering & Programming field, Seedbox piqued my interest.
In the past, I’ve downloaded large files such as Linux installation files, gigs and gigs of data but one thing I noticed, torrents makes the download so much faster than the regular FTP/HTTP(s) downloads.
Another thing which I noticed is quite important and could make BitTorrent protocol future of Asynchronous downloads is that it checks for chunks and chunks of data before and after you download the files which makes it certain that you shall not end up with the corrupt data or files. I don’t think FTP/HTTP(s) downloads does that, the verification of files & their check sums.
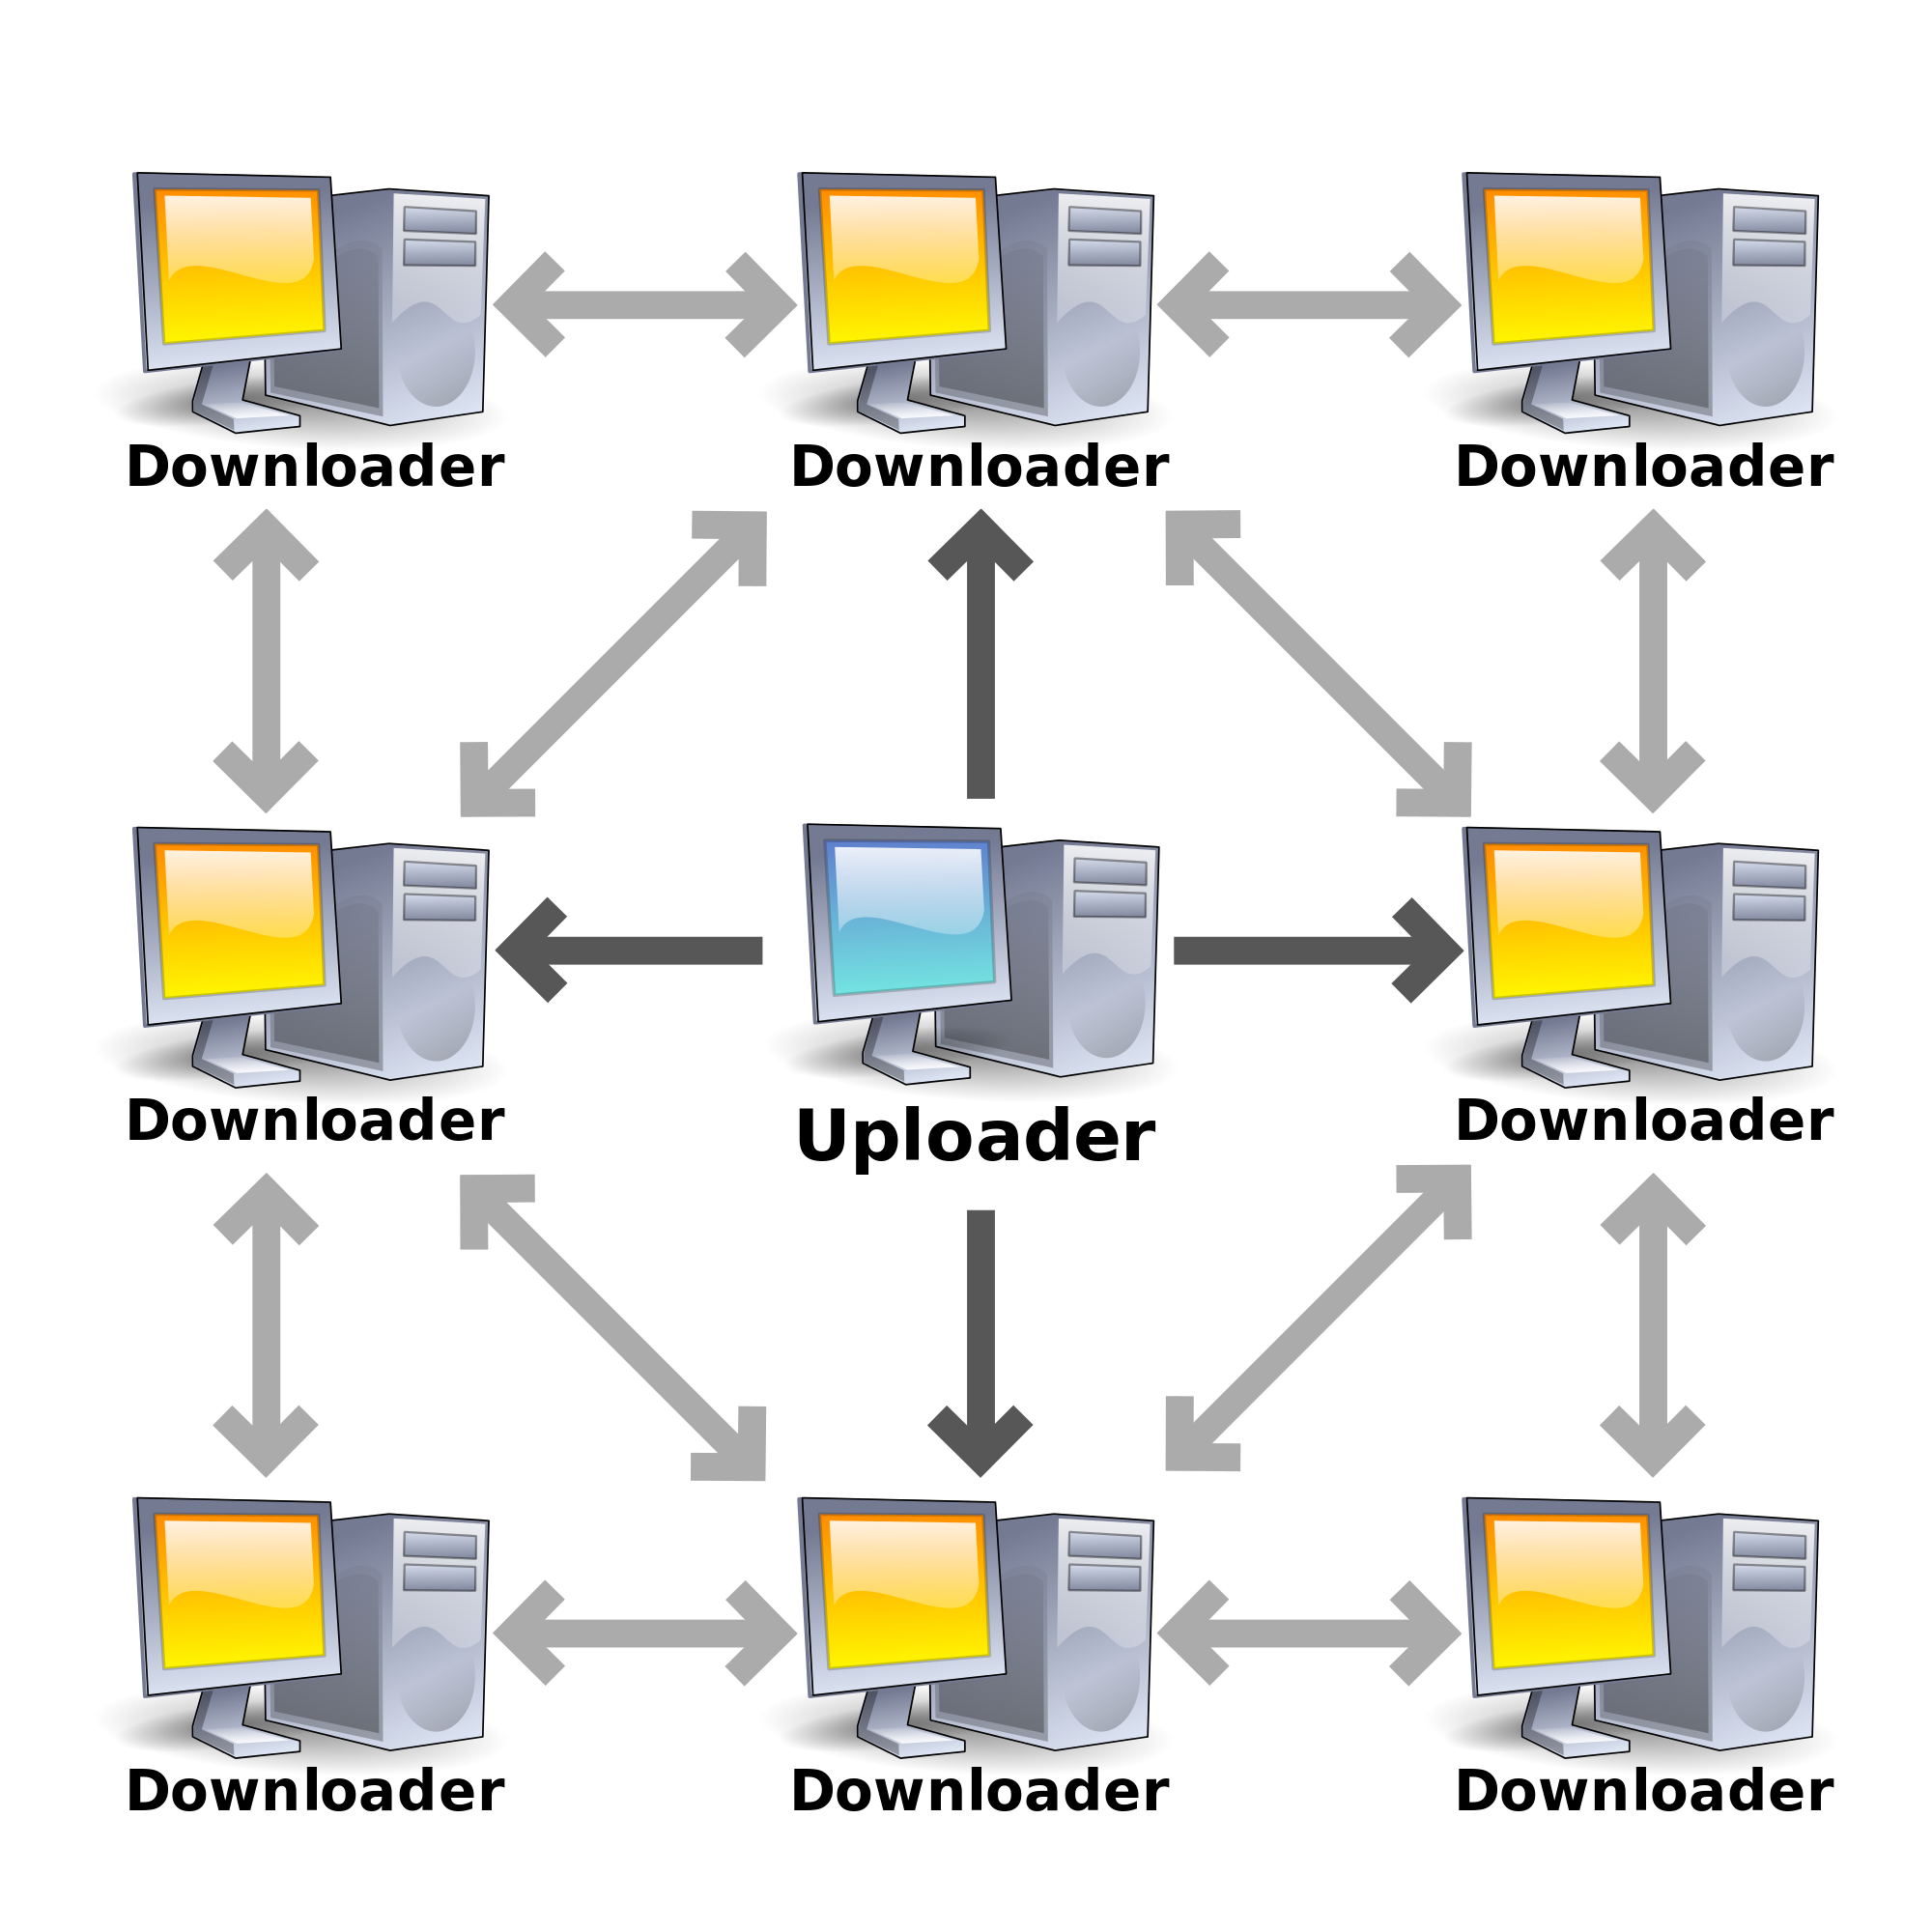
Seeders and Peers, each does their part and it shall be played, if not, you aren’t contributing towards the sharing of a file which they call leechers. Seeders are the ones who are already in possession of complete file(s) whereas Peers is you who is requesting files from the seeders.
I found this image which explains better than my words from Wikimedia. The uploader shares his files with couple seeders or just one and when more peers joins the network requesting for the same files, there will be two seeders. Once the 3rd person downloads the files completely, he becomes a seeder as well and the chain goes on. More the seeders, faster the download, in a sense and you can feel the difference between less seeded torrents and rich seeded torrents.

As I mentioned before, Seedbox is just a complete system set up in a way to seed the files you already downloaded before, nothing more and nothing less. The difference between your regular machine and a Seedbox is the hardware specifications such as RAM, Storage, Processors and the internet. You can definitely call a Raspberry PI with an Operating System and a BitTorrent client a full fledged Seedbox but the network speed and the system’s uptime factors it out of the list, in most cases!
Setting up a Seedbox -
Before I move onto the setup of Seedbox, I also wish to make it clear that this tutorial is written for an educational purpose, the way readers put it into practice or use it, does not concern me nor can I be held accountable.
I wish to let my readers know that there are plenty of services out there which excels in seeding your files but the sole reason for me to set one up and go through this hard work is to learn and of course, fragile economy.
Pros and Cons of buying a Seedbox
Buying a Seedbox service – Pros
- Security, responsibility and hard works are all taken care of, for a price.
- Amazing network, pooled or dedicated, the speed is amazing.
- You show your contribution towards the file sharing, hopefully legally.
- You won’t be wasting your home bandwidth. Mine’s 250GB per month, my custom Seedbox has unmetered bandwidth (imagine the fun!)
Buying a Seedbox service – Cons
- I could see only one disadvantage of buying a Seedbox service, the expense. Good Seedbox price ranges from $5-7, Better Seedbox ranges from $10-$15, Awesome ones needs more investment.
Creating your custom Seedbox – Pros
- Knowledge and understanding of Peer-2-Peer transfer protocols.
- The network and hardware performance depends on the kind of Seedbox you build and the existing service you have or have been provided with.
- Your setup, your configuration, your system and your Seedbox!
- Easily transferable to different systems by taking a snapshot of your system with 0 torrents and complete setup.
- You can use VPN (Virtual Private Network) on your custom Seedbox to stay out of radar and sometimes increase your Seedbox’s performance.
Creating your custom Seedbox service – Cons
- Probably the biggest disadvantage of setting up your custom Seedbox is the amount of work you put into it while setting it up.
- Economy? Not so much but does require maintenance and some post-setup problems.
- The rules, laws and all, your responsibility depending on the kind of work you do with your Seedbox.
Let us setup our mighty Seedbox
Things you need
- BitTorrent client of your choice, I will go with Deluge for the sake of ease.
-
VPS/Dedicated server if you wish and can afford whereas a dumped machine or $5-$25 Raspberry PI if you want to save some money.
-
A little experience in Linux machines or CLI stuff..
-
A cup of coffee.
- Roll up your sleeve.
Let us start with the preparation, I used CentOS for the operating system of my choice as I am a little experienced with it and it takes very less hard disk space because I used CentOS minimal x64 bit. Minimal is a no GUI system, full CLI, I was looking to save and allocate as much memory and disk space for the torrents rather than just the operating system. Deluge’s repository is not available in CentOS by default therefore, let us reference it from Linux-Tech.
nano /etc/yum.repos.d/linuxtech.repo
Append linuxtech.repo file with the content provided below.
[linuxtech]
name=LinuxTECH
baseurl=http://pkgrepo.linuxtech.net/el6/release/
enabled=1
gpgcheck=1
gpgkey=http://pkgrepo.linuxtech.net/el6/release/RPM-GPG-KEY-LinuxTECH.NET
Let us prepare our machine for its transformation.
sudo yum update -y
Install Deluge.
yum install deluge-daemon deluge-web deluge-common deluge-images
For the security purposes, lets create a new user which has the access to Deluge.
useradd --system --home /var/lib/deluge deluge
Before we do anything, let us stop our deluge service, if there’s any running by default after installation.
service deluge-daemon stop
A small edit in our deluge-daemon to start the deluge-web with the daemon, edit the file /etc/init.d/deluge-daemon and find the following.
daemon --user deluge "$prog2 --ui web >/dev/null 2>&1 &"
Comment it with # and append a newline and add the following.
daemon --user deluge "$prog2 >/dev/null 2>&1 &"
Which will probably result in something like this..
start() {
    echo -n $"Starting deluged service: " daemon --user deluge "$prog $OPTIONS"
    RETVAL=$?
        echo [ $RETVAL -eq 0 ] && touch $lockfile
        echo -n $"Starting deluge web ui: " #daemon --user deluge
        "$prog2 --ui web >/dev/null 2>&1 &" daemon --user deluge
        "$prog2 >/dev/null 2>&1 &"
        RETVAL=$(($RETVAL|$?))
    echo [ $RETVAL -eq 0 ] && touch $lockfile2
    return $RETVAL
}
That’s it, didn’t require much hard work until this point, I suppose?Let us fire up our Deluge.
service deluge-daemon start
Add deluge-daemon to run after reboot, for automation.
chkconfig deluge-daemon on
Your deluge’s configuration files are located at /var/lib/deluge/.config/deluge by default which you can edit and make changes according to your needs.You can access your deluge-web from the port 8112 by default. If you wish to check, try it with your remote IP in your browser http://<servers_ip>:8112. You can edit it from the web.conf configuration file located at /var/lib/deluge/.config/deluge/web.conf.
"port": 8112 # Change it to whatever you want!
I had an output like this.

Securing my Seedbox.
I went a little further and tried to secure my machine as to limit the access of my Seedbox to the files I downloaded by creating a new user with different home directory. I enforced a password to my Deluge-WebUI and Two-Factor Authentication to my server which in result had 3 layers of security in total.Before making changes to our configs, stop the deluge-daemon.
service deluge-daemon stop
You can set your deluge-daemon and deluge-web password via. web.conf file, once again located at /var/lib/deluge/.config/deluge. Edit it with your favorite editor, I use nano.
nano /var/lib/deluge/.config/deluge/web.conf # Or lets make it easier for later.
cd /var/lib/deluge/.config/deluge/ && nano web.conf
Find "pwd_salt": " and open notepad in your local machine. Append three newlines with three words of your choice. For me, it was ..
seedbox noninfectious knowledge
Now head over to MD5Decrypt site and encrypt all three words, separately.
seedbox : b92f5d4735c2739a20ad59ecc627202b
noninfectious : 2cbbafef24ba50694281688da0b9bcc5
knowledge : a542e9b744bedcfd874129ab0f98c4ff
Concatenate all 3 hashes.
b92f5d4735c2739a20ad59ecc627202b2cbbafef24ba50694281688da0b9bcc5a542e9b744bedcfd874129ab0f98c4ff
# MD5 the concatenated string
482199df91c666fd898c12aee7979693
# Add 8 random characters of your choice
482199df91c666fd898c12aee7979693seedbox1
# 40 in Length
Head back to web.conf and replace the psw_salt value with the final hash we generated, 482199df91c666fd898c12aee7979693seedbox1.Start the deluge-daemon.
service deluge-daemon start
Go to the Deluge-WebUI at
:8112and go to the Preferences > Interface and apply the password of your choice.

What we did was generate a different salt which will be encrypted again by Deluge and used to salt our password during the login.
Applying Two-Factor Authentication.
Head over to my old blog post and follow that tutorial.
New user, limited access using Chroot.
Chroot is an operation that changes the apparent root directory for the current running process and their children. A program that is run in such a modified environment cannot access files and commands outside that environmental directory tree. This modified environment is called a chroot jail. (Source: Archwiki)
Let’s create a new user who has the access to our torrent directories.
useradd -d /home/Seedbox seedbox
# Password protect it
passwd seedbox # Type in the password you desire for the user seedbox. seedboxtest
# Lets not allow them to SSH to the server
usermod -s /sbin/nologin seedbox
I like organizing my files and directories therefore I created a good directory structure to store the torrent files, processing files and processed files.
mkdir /home/Seedbox/{Torrents,Processed,Processing}
If you wish to restrict the user even more, it can be done so as to allow the restriction to Processed directory.
usermod -m -d /home/Seedbox/Processed seedbox
That’s about it for Jailing the user to a certain directory in order to refrain him from deviating from his action. We can’t have adventurous people with access roaming around now, do we?
FTP Access using VSFTPD.
If your Seedbox is locally accessible, I don’t see any problems with sharing the files between you and your Seedbox but if you have a remote Seedbox, hosted out of nowhere then I am pretty sure you would want to access the files in the future. That’s when VSFTPD comes into play.VSFTPD is a FTP service for CentOS and other Linux distros.If you have your deluge-daemon running, I suggest you to stop it, not required but still.
sudo yum install vsftpd
Now, accessing the files through FTP is just a tip of the iceberg, securing it, another problem but we shall get there momentarily. Your vsftpd config files are located at /etc/vsftpd/

I made couple changes to the vsftpd.conf file as to restrict access to everyone except one user seedbox. Depending on your necessities, do make changes to your configuration file. As for me, to only allow access to the user seedbox, my config settings are as follows.
# Allow anonymous FTP? (Beware - allowed by default if you comment this out)
anonymous_enable=NO

# Uncomment this to allow local users to log in.
local_enable=YES

# Uncomment this to enable any form of FTP write command.
write_enable=NO

# You may specify an explicit list of local users to chroot() to their home # directory.
# If chroot_local_user is YES, then this list becomes a list of # users to NOT chroot().
chroot_local_user=YES

## Custom Settings ##
download_enable=YES
# Max login fails was set to 1 because why not?
max_login_fails=1
pam_service_name=vsftpd
userlist_enable=NO
tcp_wrappers=YES
Now, let us add our user to our FTP group.
useradd -G vsftpd seedbox
You can definitely secure your FTP protocol using SSL/TLS handshakes which I am too lazy to write as this blog post is already too long therefore, I’ll just post the configuration for it and procrastinate on explanations.
# Using FTP over SSL/TLS
rsa_cert_file=/etc/ssl/seedbox.pem
rsa_private_key_file=/etc/ssl/seedbox.pem
ssl_enable=YES
allow_anon_ssl=NO
force_local_data_ssl=YES
force_local_logins_ssl=YES
ssl_tlsv1=YES ssl_sslv2=YES
ssl_sslv3=YES require_ssl_reuse=NO
ssl_ciphers=HIGH
If you do wish to use FTP over SSL/TLS, head over to /etc/ssl/ or make a directory for it if it doesn’t exist.
mkdir /etc/ssl/
# In order to generate single file certificate
openssl req -x509 -nodes -days 365 -newkey rsa:1024 -keyout /etc/ssl/seedbox.pem -out /etc/ssl/seedbox.pem
Restart your vsftpd and start your deluge-daemon
service vsftpd restart service deluge-daemon start
If you are a streamer and wish to use FTP over SSL/TLS, I am still researching on it as I tried to stream a video file in my iPad and had SSL enabled for vsftpd, I wasn’t even able to list the directories properly. I can access the files via. Filezilla while SSL/TLS was enabled but not from the web or no direct connections, weird but what the hell right?Make this change in your Filezilla in order to effectively use FTP over SSL/TLS.
 Explicit FTP over TLS")
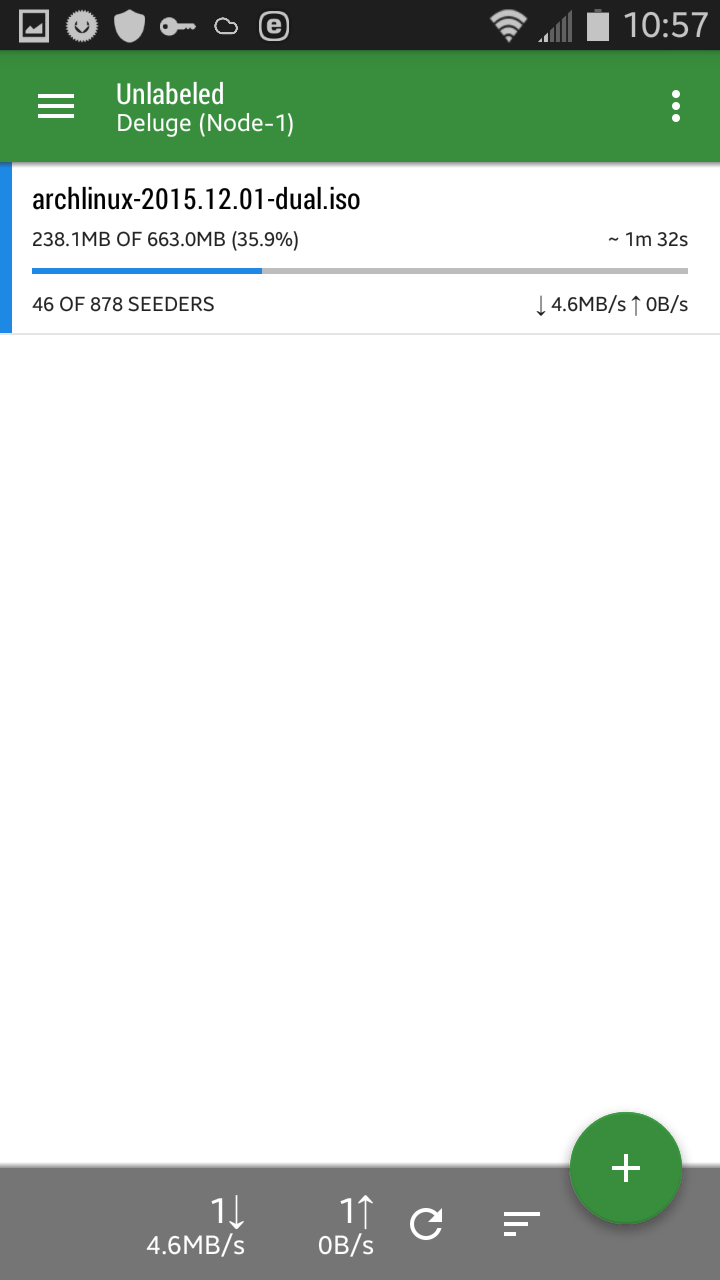
Another awesome stuff that I wanted to share for Remote Connections through your mobile devices, as an Android fan, download Transdrone. It is a nifty little tool which has availability for various BitTorrent platform. First of all, you need to allow remote connections to your deluge-web/daemon.
Go to your Deluge’s WebUI > Preferences > Daemon > Check Allow Remote Connections.
")
In Transdrone, head over to Settings > Add new server > Add normal, custom server and follow the settings provided below.
Name : My Seedbox(Whatever you want)
Server type : Deluge 1.2+
IP or host name : Seedbox's remote IP
Username : seedbox (if you followed this tutorial!)
Password : seedboxtest (if you followed this tutorial!)
Deluge web password : Click the link below
Everything stays default unless you wish changed it.
Deluge-daemon port : 58846
Deluge-WebUI port : 8112

Once again before, I publish this article.
I accept no liability for the consequences of any actions taken on the basis of the information provided by me or the contents of my blog. Everything I post is intended to acquire knowledge and interest.
Enjoy and use it safely!
Credits to QuickhostUK